2nd April 2007

Pondering Possibilities Presented by Pretty Plastic Particles

So, the other day, I became temporarily obsessed with these little plastic nuggets:
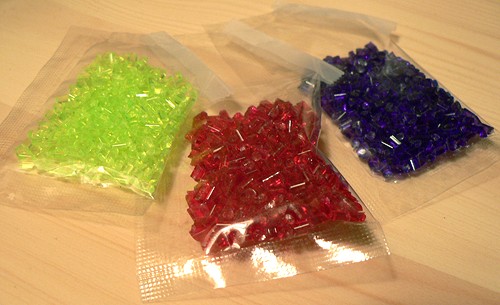
Just one word. Plastics.

I have fond childhood memories of filling up little metal frames with these plastic bits and melting them in the oven to make stained-glass suncatchers. But for the life of me, I couldn’t remember what the heck they were called. A lot of Googling time only brought up a company that makes Jewish-themed ones, and I’m pretty sure I wasn’t making stained-glass dreidels and menorahs when I was a kid. It was more like mushrooms and butterflies and frogs — y’know, good ’70s stuff. Just when I was ready to give up, I found ‘em — they’re Makit & Bakits. And they’re still making them!

Kindergarten-level glazier

Well, that meant a jaunt to my friendly neighborhood craft store was in order. Sure enough, there was a very small selection of kits. They even make glow-in-the-dark ones now. I had to buy one. I picked out this little flower one, just because the colors were more interesting than the ones in the other sets. It rang up at $1.35 (!). It was definitely at least $2, maybe even $3, worth of fun. That’s value, my friends.

I cheated and mixed the colors on the petals, because I like it when the nuggets blend together like that. I’m happy enough with how it turned out, but I don’t know what I’m going to do with it; it will probably live a prostrate and nomadic life, moving about the house from one flat surface to another along with random scraps of papers and other doodads, until I throw it out.

So, now what? Here’s what — I’ve got a whole mess of those little plastic nuggets left. They seem to have designed these kits to come with enough pellets to recover from a spill onto the particle abyss that was a ’70s shag carpet. I think I might actually somehow have more of these plastic bits than I started with. It’s the melting of the plastic bits that’s the most fun with these — the frames are kind of ass — so I can’t just throw these out, I’ve got to melt them. But how? In what shape?

My current thinking is that I want to lay them out in a disc shape and melt them, and then, while they’re still warm, shape them into a little bowl. Kind of like they do on television cooking shows with grated parmesan. But I can’t help but think that this is worth pondering a little bit more.

Got any ideas?

posted in Art, Crafts | 6 Comments

30th March 2007

Bacon Is Sexy

Miss Delirium Tremens, photo by Ted D'Ottavio
Miss Delirium Tremens,
photo by Ted D’Ottavio

My bacon costume inspired the delightful Miss Delirium Tremens to send me a sweet message… turns out she’s got a great bacon costume of her own, but hers is decidedly more sexay than mine. Click here to see it… it’s street legal, but probably NSFW.

posted in Art, Crafts | 1 Comment

23rd March 2007

How to Meat People and Be Loved: The Bacon Costume

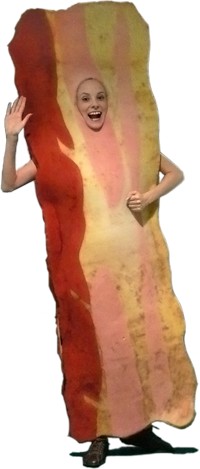
I'm bacon!
I’m bacon!

Last year for Halloween, I was bacon. If you’ve never been bacon before, I highly recommend it. Everybody, you see, loves bacon. It is, as my friend Monica says, the Candy of the Meats.

People do not want to be quiet about their love for bacon, they want to declare it, often loudly. Even the most shy people at least muttered “bacon!” under their breath as they passed me. I have never been so popular, so adored (and strangely, so hit-on) in my life.

I won the costume contest, which was novel for me — I’ve never had a costume that would have even been considered a contender before. It might have been influenced by my handing out bacon to everyone at the party. But I couldn’t be the very embodiment of temptation that is bacon without following through with some actual meaty goodness — as it was, I had more than a few people trying to bite me.

It was a beautiful experience, and one that everyone should be able to join in, so here are the instructions on how you, too, can be bacon for a day:

  1. Buy two sheets of foam from a foam supply store. The sheets I got were 2′ x 6′. You’ll also need 2 or 3 colors of spray paint, some big plastic bags, stick pins, a hot glue gun and glue, and a few feet of heavy-duty 2″ velcro.
  2. Lie face-down on one of the foam pieces, letting your feet hang off the edge, and trace the edges of your face on the foam with a big black marker. If you’re like me, you’ll wind up with black marker on your face, so be sure to wash that off quickly.
  3. Cut out the face hole.
  4. Lie down on the foam again, this time to mark where the top of your shoulders will be when your face is lined up with the hole. Mark the edges of the foam with a black marker.
  5. Glue the two pieces of foam together at the top, above the shoulder lines, leaving enough room for your head. I used a combination of spray-mount glue and a hot glue gun. I’m a little embarassed to own a hot glue gun, but making this costume makes me feel a little better about it.
  6. Use the black marker to trace an uneven, bacony outline on the foam.
  7. Cut away the edges of the foam. Bevel the edges of the foam, to give it a slightly rounded, and less-obviously-foam appearance. Try to not freak out at the sight of all the little squirrelly bits of foam that are all over your living room.
  8. Leaving room for an arm hole, glue one side of the bacon together. I used my hot glue gun, with slightly less shame this time. Be generous with the glue, this is where your costume is going to get strained.
  9. On the other side, apply some nice, wide velcro to the opening (again, leaving room for an arm hole). I used industrial strength, 2″ wide velcro, and it worked great. It’s self-stick, and it adheres to the foam just fine.


Read the rest of this entry »

posted in Crafts, Food | 55 Comments

13th March 2007

How to Make a Bindleflop

The Problem:
Carrying grocery bags, while not the worst of life’s trials, is kind of a pain in the butt. And the hands: those plastic handles get mighty uncomfy when you’re carrying cans and cans of Hobo Soup. The bags whack against your legs, unless you hold your arms out awkwardly. Each time you have to hit an elevator button, retreive your keys or open a door means a clumsy minute of bag juggling and rearranging.

The Inspiration:
Hobos. More specifically, the bindlestick. That’s the name for the kerchief-tied bundle at the end of a stick that is the icon of hobo living.

The Junkyard Clubhouse Bindleflop

The Solution: the Bindleflop
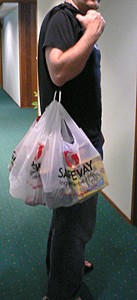
The Bindleflop lets you carry your groceries, or any handled bags, easily on your shoulder. The Lose Weight Exercise is rested at your shoulder instead of in your palms, making it much easier to go long distances without your hands getting fatigued. Instead of swinging around and whacking into your legs, your bags gently brush against your side. And your hands are free to handle doors, keys, or carry more groceries!

Groceries in a Bindleflop

How to Make Your Very Own Bindleflop:
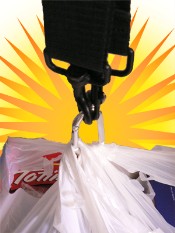
Take a removable strap from an old laptop case. They typically have metal clips at the end that spin freely. Clip both ends onto a carabiner*. Slip your grocery bags, or any other handled bags, into the carabiner. Slide the Bindleflop onto your shoulder, orienting any bags with squishy stuff (tomatoes, bread) to the outside.

Bindleflop in action

Hanford and I have been kicking around the idea for the Bindleflop for a while now. At first, it was only half-seriously, but we tried it out for the first time last night, and were surprised at how comfortable it was, and how well it worked. Since it’s so easy to grab it on the way out the door (unlike a folding cart), it’s likely to become something we use regularly.

* I grew up in Seattle, where they give you a carabiner along with your first teddy bear when you’re born. I don’t know if they’re as easy to come by in other parts of the world. You can find them at sports stores.

posted in Crafts | 11 Comments

10th March 2007

Baker’s Coconut Cut-Up Cakes

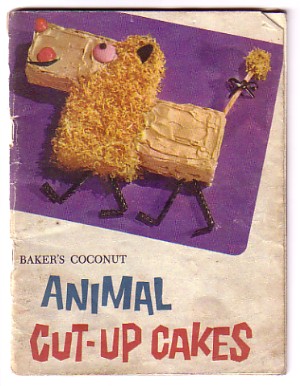
Baker's Coconut Animal Cut-Up Cakes
Baker’s Coconut Animal Cut-Up Cakes

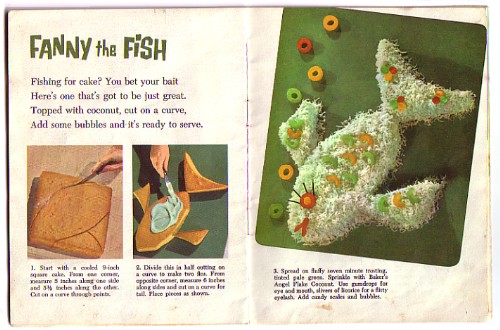
I’ve had this up on my photo pages for a while, and it’s perfect for Junkyard Clubhouse. This Animal Cut-Up Cakes booklet, put out by Baker’s Coconut in 1959, has full-color photos and instructions to make about a dozen different animal-shaped cakes by cutting up standard size round and rectangular cakes — and then encrusting them with unnaturally tinted Baker’s Coconut, of course. That’s Dandy-Lion pictured there on the cover, I had him for my fifth birthday. My brother had Fanny the Fish for one of his early birthdays.

My grandmother probably ordered away for it, it wound up with my mother, and I’ve had it with me since I moved out of the house. Aside from my sentimental attachment to it, I also think it’s beautifully designed and photographed, and it is just so 1959 (right down to the illustrations of a housewife baking in a dress and high heels). I have the whole thing scanned and up at Humuhumu’s Life in Photos, where you can see Tortie the Turtle, Ella Elephant, Quack-Quack the Duck, and all their coconutty friends.

This booklet inspired me to create a cut-up cake of my own design, a hula girl — you’ll find directions for her there, too.

UPDATE: Looking for Easter Bunny Cut-Up Cakes? I’ve got some here: Baker’s Coconut Easter Bunny Cut-Up Cake

Fanny the Fish Cut-Up Cake

posted in Crafts, Food, Midcentury | 122 Comments

9th March 2007

Tripping the Pickle Fantastic


Electric Pickle demonstration from Duchamp on YouTube

I got this from Penn & Teller’s very fun 1992 book, “How to Play With Your Food“. I picked up all kinds of neat tricks from that book, but this is far and away my favorite: the glowing pickle trick. I’ve done this dozens of times. It’s pretty simple really: you just plug a pickle into the wall. You’re probably saying to yourself “that sounds dangerous,” and you’re right — it is. As a matter of fact, Penn & Teller’s book doesn’t actually tell you how to do it — they just point out that it’s possible, without giving instructions. I like you better than Pell & Teller do, though, so I’m going to tell you the particulars. But still — this involves exposed wires, which makes it dangerous, so don’t do it. Now that I have that disclaimer out of the way, here’s how to do it:

Read the rest of this entry »

posted in Crafts, Food, Science! | Comments Off